Showing posts with label science. Show all posts

Thursday, 19 April 2018

Making Science Fun : Exploring the Solar System with Kids


Science Fun Solar System Kids Rocky Planets size and distance
Noah looks out on the solar system

Space has often featured quite highly in our homeschooling as at one time or another it’s interested different members of the family. Perhaps you remember the space station we made when Noah was obsessed with Tim Peake? So it’s no surprise that we had a blast exploring the solar system together recently.

Making Science Fun is easy when you have great hands-on activities to do as well as entertaining videos to watch and good textbooks. For the Solar System we were inspired by the amazing book Astronomy Lab for Kids by Michelle Nichols. The 52 activities inside our inspiring and challenging. Even better they use household supplies so you don’t have to run out and spend a lot of money on extra equipment – yay!


Introducing the Solar System


To begin our study of the solar system. I first asked the kids questions like what do you know about our solar system? And, can you name any of the planets? We then watched some videos suggested by national geographic. They were a fun mix with some songs and funny stuff mixed in.


Getting an idea of scale


Once we’d familiarised ourselves with our solar system we got ready to do a demonstration from the Astronomy Lab for Kids book called, Take a walk on the rocky planets. The rocky planets are Mercury, Venus, Earth and Mars – the four closest to the sun. The other planets are gassy planets.

To do this demo we first had to make a giant circle to represent the sun. We followed the instructions in the book and taped together pieces of A4 until we had a big enough square to trace a circle with a 92cm diameter. We also followed the instructions to trace our circle. What we did was tie a 46cm piece of string to a pen and then held the string down in the centre of the paper while we used the pen to trace the circle. This was a great skill for the kids to learn.

Solar System Sun Model Rocky Planets


Next we made the 4 rocky planets our of play-doh. This was actually quite hard as they had to be really tiny, we’re talking mm. The kids really enjoyed trying and measuring them to see if they were the right size. We then taped our play-doh planets to pieces of paper with the names of the planets on them. Be careful if you do this to make sure the little play-doh planets are well attached or you might lose them like we did! 


Science Fun Solar System Kids Rocky Planets
 

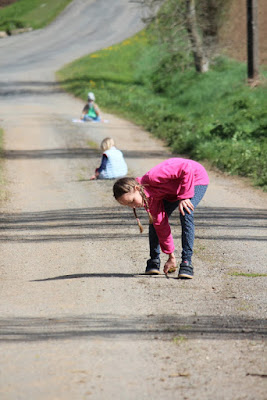
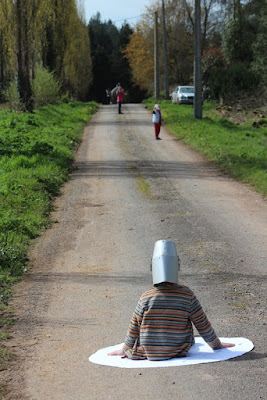
It was now time to head outside. First we placed the sun right at the far end of the (very quiet, read virtually unused and private) road outside our house. Noah (8) sat down on the sun. Yes, he is wearing a helmet as he decided he needed to dress appropriately if he was going into space! 


Science Fun Solar System Kids Distance between Planets
 

Lotta (5) and I then paced out the 62 steps to get to Mercury. The steps had to be approximately 60cm long. We used a tape measure to check. Lotta sat down holding Mercury.


Science Fun Solar Sytem Kids Mercury

Maya (12) then paced out the 54 steps to Venus. Then I took 45 steps and placed the earth and finally my husband Frank paced a whopping 84 steps to be Mars.

Science Fun Solar System Kids Venus

This experiment was easy to set up because we had all the supplies on hand. It was fun to execute. I told the kids we were going on a space journey to see how far the rocky planets were from the sun. It was brilliant for getting an idea of the scale of things in space, not only the distances between the sun and the planets but also how giant the sun is compared to the rocky planets.

The kids really enjoyed not only the making part of this but also the demo.


Making a Model of the Solar System


Later on that day we worked on three different models of the solar system to help fix what they’d been learning in the kids minds.

This was really easy to adapt to different ages. For Lotta, I printed a picture of the solar system to colour in then traced it onto water colour paper because she decided she’d like to paint the solar system. She really enjoyed painting although it was a bit fiddly with some of the smaller planets. If I were to do this again with a five year old I’d probably scale it up so it would be better adapted to their fine motor skills. 

Science Fun Solar System Kids Make Model
   
Noah was lucky to have one of these. His sister has one too but she painted hers ages ago. It had been sat in his drawer for a bit and our morning’s activities really fired up his enthusiasm. He really enjoyed using our DK encyclopedia to make sure he painted all the planets accurately.

Science Fun Solar System Kids Make Model

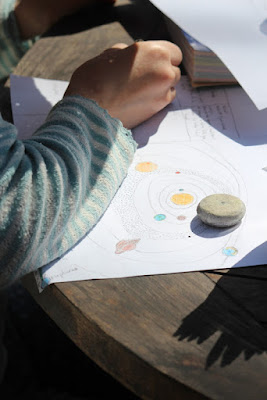
Finally, Maya drew the solar system in a circular fashion to show the planets in orbit round the sun. She added a scale across the bottom which shows distances between the planets. And also a section on the right of her paper to write a little bit about each of the planets. Again she used the DK Encyclopedia for information. 

Science Fun Solar System Kids Make Mmodel


Classifying the Solar System


Our final activity was a sorting game. This activity also came from Astronomy Laboratory. I printed off about thirty pictures of our solar system and the children took it in turns to put them in groups based on their own organsiational systems. The other kids then had to try and guess what their categories were. 

I was pleasantly surprised at how much the kids loved this simple game to the point that they got up and started playing it again the very next day!


Conclusion


Making science fun is easy if you use good books, hands on demos or experiments and let them express themselves when recording what they've learnt. 

Exploring the Solar System has been a really memorable and rewarding experience so far. Yes, so far because we still have a whole host of other projects from Astronomy Labo we'd like to try out as well as some more fun looking documentaries to watch! 


Thursday, 12 April 2018

Making Science Fun : Our Top Three Science Shows for Kids

We watched quite a few tv shows last week when we all came down with a horrible flu-like virus. It was one way to feel we were still doing some learning. It inspired me to finally get round to writing this blog post and sharing with you another way of making science fun with our top three science shows for kids. 

Screen time can be a complicated thing when you're homeschooling. On the one hand, we've all read the literature about how too much screen time is bad for our kids. On the other, there are just so many great documentaries out there and it would be a crying shame not to exploit them! Because I have to admit I get tired of the sound of my own voice. I don't want my children only to hear and learn things from me. It's important to shake things up, find other teachers. And a really good documentary or TV show can be just that.

Science Max


Science Max is currently one of the children's favourite things to watch period. It's up there with Star Wars and Coco and many other of their favourite films. Quite a feat. Made by the Canadian company TVOkids, it's secret formula is a young, appealing presenter and a fun concept - let's do everything bigger!

Yes, Science Max takes your average experiment even we can do at home and does it again and again bigger and bigger. The kids absolutely love this especially when it involves Phil the presenter getting wet or dirty. I like it because it repeats the science several times in slightly different ways. This means the kids see the science repeatedly but without it being boring. 


Repetition is really important in any learning situation and a show that manages to do this while having my kids and I in fits of laughter is a definite winner. 


Absolute Genius with Dick and Dom


A BBC show, Absolute Genius is a fun, exciting watch. The first two series celebrate famous scientists. They explore the concepts they were working on in fun and entertaining ways. In series three and four they explore technological inventions and then 'monster builds'. 

As with Science Max there's a high entertainment element to be had from watching the two presenters do stuff. It might be getting inside a Faraday cage or fully clothed in a bath or jumping into canoes to study the principles of Archimedes screw. Whichever, it's always funny to watch as well as informative.


C'est Pas Sorcier 


Ok so this one's in French I'm afraid for all you English only speakers out there. But I couldn't make a list of our top three favourite science shows for kids without mentioning it! We love C'est Pas Sorcier because it covers so many different and fascinating topics. It also combines demonstrations with visits to relevant real life sites that illustrate the science. Hey tv show makers out there, why not copy this fabulous french formula for your next science show! 


Although some people might disagree I don't believe watching shows, even as good as these, is enough by itself. We use them wisely in conjunction with books and home experiments to help us understand more fully the concepts we're studying. We usually do anything hands on before we watch the TV shows too. This way the kids go into their experiments in the real position of a scientists who doesn't know what the outcomes might be. 

What TV shows are great for is consolidation through playful repetition and colourful exposition of the ideas and theories we're exploring. And these shows do this so well that the kids often ask to watch them again and again.

These shows are also good at inspiring kids to see science as being something that's fun. With their goofy presenters, the infallible humour of seeing someone get covered in foam and the excitement of seeing a really big or dangerous experiment they inspire my kids to feel passionately that science is worth being interested in. Without them our educational environment would be infinitely poorer. Well done to all those television makers for making such great shows!

Thursday, 22 March 2018

Making Science Fun : Weather Reports

Snow Brittany Making Science Fun Weather Charts
A light dusting of snow


The weather has been rather strange recently hasn't it with late cold snaps and unexpected snow. Perhaps that's why we decided to make our own weather reports. To chart the weather for a week and see what we found out.

I know a week isn't very long but this was just a beginning. An overture if you like into the world of scientific observation, chart making and eventually data interpretation. 

It was a great way of making science fun by combining a crafty activity (chart design and execution) with a hands on one (checking the local weather outdoors) and a computer based one (looking up the wind direction and the weather in other locations). 


Making Science Fun Weather Charts Home Education Geography Maths
Maya preparing her charts

Observation

Before I tell you how we went about making our charts, I'd like to talk about observation. As I mentioned in previous posts, I think it's important that kids learn about and apply the Scientific Method. Observation is for me one of the cornerstones of any good scientist's (and artist's for that matter!) approach to his work.

"Observation is essential in science. Scientists use observation to collect and record data, which enables them to construct and then test hypotheses and theories."
                                    Science Learning Hub
Observing something and recording your results is a classic scientific activity. Charting your observations is one way of recording your data. 

Encouraging observation skills can begin very early with very young children. It starts by talking to them about things you notice like new buds on the trees or the first blossom. Or how the iced over puddles look like they have trapped stars in them. These kinds of observations encourage children to look closely at things. They foster an attitude of wonder faced with the magic or science of the natural world. 


Making Science Fun Weather Charts Home Education Geography Maths
Lotta's Weather Chart

Record making

This time we chose charts or tables to record our observations. We often record our natural science observations in nature journals (herbiers) and water colour sketches. 

Combining craft and science is probably one of the most effective ways of making science fun for kids. Although this is often fostered in younger children, older kids often miss out on the crafty side of things in school as the work environment gets more serious and focussed on written records. I think that's a great shame as artwork and making things can really help invigorate their studies and help things stick in their minds.

Making Science Fun Weather Charts Home Education Geography Maths
Rainy day in New York City

Making Science Fun Weather Charts Home Education Geography Maths
Snow falling in Paris

Why weather?

My kids have always been interested in the weather and the seasons. They're used to observing it and using that information to fill in the little calendar we have up on the wall. Furthermore, choosing the weather for our first chart making task made this a cross-over activity covering concepts from maths and geography as well as scientific method. 

Making Science Fun Weather Charts Home Education Geography Maths
A book we used for inspiration
 

How we did it

  • First we talked about what a chart is and why we might want to make a record of the weather. We also discussed how meteorologists gather their data. 
  • We looked at some examples of weather charts and decided to chart the weather in our commune (local area), St Barthélémy. Both girls also picked another place to chart.
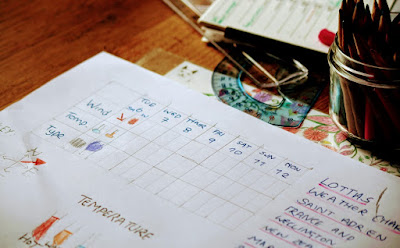
  • We agreed our charts would cover one week and record wind direction, temperature and weather type.
  • We drew up our charts (8 columns and 4 rows)
  • We filled in the days using our calendar to help us* (this led to an interesting conversation about abbreviations such as Mon and how we write the date).
  • We devised a key. This involved deciding on how to depict the weather conditions, the wind direction and temperature. 
  • Our charts were ready to be filled in so we did the first day!
  •  
Making Science Fun Weather Charts Home Education Geography Maths
Using the calendar to fill in the days and dates


Individualization

There are several ways to individualize this project. In our case both girls decided to chart their home town and another place. 

Maya (11) picked Manchester, UK a city we have visited. Lotta (5) picked Wellington City, NZ because she really wants to go to New Zealand. 

The children were also able to personalise their charts by designing their own symbols for the different weather types. They all really enjoyed thinking them up.   

Making Science Fun Weather Charts Home Education Geography Maths
Noah's Weather Chart


Adapting this activity to different ages

This project is easy to adapt to different ages. For younger children you might need to give more help with drawing the table. I began the lines for Lotta at either end and then she did the joining up using a ruler. I also helped her with the writing by doing dot to dot letters for her to trace. She really enjoyed drawing her weather type symbols including a purple umbrella for rain! 

Noah (8) was able to do his table by himself. He needed some input particularly for revising the cardinal points and writing the text. He came up with an airplane symbol to indicate wind direction which was very innovative. 

For an older child like Maya there are lots of ways to make this more complicated. She was able to do her own research online to check the weather report each day. Concerning her chart she also chose to record the temperature in degrees Celsius rather than as cold, warm or hot like her younger siblings. 


Making Science Fun Weather Charts Home Education Geography
Maya filling in her weather chart for Manchester


Recording our Results

We filled our charts in for a week. Although the children did forget at least once each, they were able to complete their charts by asking their siblings. Only Maya the eldest ended up with a hole in her data. I felt this was an important lesson for her to learn, that you need to be constant to get good scientific data.

I know a week might not seem very long, but I felt it was a good beginning without the project becoming tedious. We have enough data to produce a graph, work out an average and a mean, all things I'll be doing with Maya. Most importantly the children ended the project still excited about it!
 
If the children show enough enthusiasm I may suggest doing this again over a longer period. I'd also like to make a rain gauge (pluviomètre) and add rainfall to our chart of local weather at least. They also want to make a traffic chart in our local town though we're waiting for it to warm up a bit first as we don't fancy standing outside for an hour in temperatures only just above freezing!

More tips next time on how to keep history and geography fascinating and fun for all ages! As well as more science with Rainbows in a Jar and our list of some of the best science videos out there.

* The gorgeous artwork on our calendar is by Victoria Keeble. It's published by the people at John Austin cards.  

Thursday, 15 March 2018

How To Help Your Kids Record their Scientific Experiments

Today, as promised I'm sharing with you the fruit of my research into how to help your kids record their scientific experiments.  


Recently we've been writing a lot of what we call science reports. You could say that's because we've been doing a lot of science experiments. However, in the past we didn't often keep a written record of what we were doing. So I suppose you might ask why now?

Home Education comes in many shapes and colours. Every family does things their own way. Some have a curriculum some have no programme at all and let their children decide how they fill their days. Others like us fall somewhere in between. As our eldest daughter has got older we've become more organised. Mostly because that's what she's been asking for. But also because as her interests have emerged we want to make sure we're giving her the foundations she needs to achieve her goals. And that my friends means more science and perhaps more importantly a strong understanding of the scientific method. Writing up her lab work seems to me an essential part of the process. 


All good scientists record their findings. As noted over at study.com,

"Science is all about collecting evidence, and if that evidence hasn't been written down at the time, people have no way of knowing how reliable your results may be." 

Not only is this an essential tool for any budding scientist to master, it's also incredibly interesting in education on several layers. Firstly, for encouraging learners to communicate and share their discoveries in the written form. Secondly, for rubbing out the line that divides real scientists and them. As soon as they decide to do an experiment, to record some data, to further their understanding, they are scientists. Even if someone's taken the steps they're taking before them. 

That said I can't emphasize enough that the most important thing is to get hands on with the kids and to make sure that what ought to be recorded in a report is covered orally. Ask the questions, what are we using today? What are we doing today? And perhaps most importantly of all, what do you expect to happen? and what is happening? 

But back to the reports and how we do them! My kids are nearly 12, 8 and 5. They all like to do the experiments and they've all been involved with report writing. Here's how you can adapt science reports to different ages and keep it fun. Because making science fun is fast becoming my mantra. And guess what, I'm having a great time myself too!


Writing Science Reports 


Whatever the age of the child a science report should cover 3 main areas:
  • Materials
  • Method
  • Observations
The words we use to label and describe these sections and the way in which we fill them in are what we can adapt to different ages and/or abilities and/or affinities. By the latter I mean that not all children like writing whatever there age or abilities be whereas some children love producing reports even from a young age. That noted, for the sake of organisation I'll be explaining three ways of recording data for the age groups 5+, 7+ and 11+.


Five and upwards


Science Reports Home Education Home Schooling kids


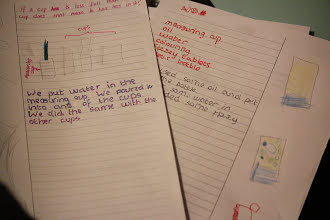
Younger children like to do things like their older sibling. My youngest daughter loves writing reports for just that reason. However this age group can also have short attention spansit's best to keep reports concise. Lotta's reports answer the questions, what did we use? with a picture. And what did we do? with a couple of short sentences. As she likes to practice writing, I write these out for her in dot to dots and she traces them. 


Seven and upwards


An older child can write a basic lab report. Although it may not be very detailed it prepares them for what may be required in the future. Noah doesn't like writing much for the moment. So although he is 8 we try to keep his reports brief. We organise it as follows:
  • Our tools
  • Our method
  • Observations
He sometimes draws the tools rather than writing a list. And sometimes I act as a scribe for him and he tells me what to write. With a child who likes writing and has more patience with the written record you could probably work on something more detailed. For us the important thing is that he gets an idea of how we record an experiment and we get a record of his personal observations concerning what happened. We are also planning to give video reporting a try to see if that medium suits him better.

Eleven and upwards


By this age a lot of children are more comfortable with writing and recording their own thoughts. They're also open to following a model. Maya enjoys this kind of written work and so her science reports are longer and more detailed. 

We are focussing on the scientific method and so I encourage her to order her reports as follows:

  • Title
  • Hypothesis (if valid as some of our experiments are demonstrations)
  • Materials
  • Method
  • Observations
  • Results (again if valid, this is often covered in the observations for the moment)
  • Science (this could also be a conclusion but Maya likes to record a bit of what she's learnt about the science behind whatever experiments we do).

Maya often illustrates her report with pictures. Recently she also included a table with mass, volume and density using the formula mass/volume = density to fill in the third column. With each report I can see that she'd refining her written skills and gaining a deeper understanding of the value and importance of record keeping.


To conclude, as I said at the beginning, we haven't been recording our scientific experiments for long and we no doubt still have a lot to learn but I hope this quick guide might be as helpful as this one was to me. For now, the kids are enjoying writing their reports.

We also chat about what we've done with other family members who weren't present (dad, grandparents...) which gives the children another opportunity to process what they did and what they observed. And that act of processing and communicating to someone else what you did is what it's all about really. 

More science fun soon with weather reports and density. And also coming up soon, digging in to history and geography with lego, tv and lots more.


Friday, 9 March 2018

Lava Lamps : The Ultimate Kids Science Experiment

Lava Lamps have to be one of the funnest science experiments we've ever done. Seriously, if you want to know how to make science fun for kids and encourage their sense of wonder you can't look much further than this.

Experiment - check, there are fluids and solids involved and  scientific gear required. Hands on - check, lots of pouring, mixing, shaking. Relevant - check, who doesn't think a funky lamp like this would be a great addition to any kid's room? Can be supported by interesting documentaries - check, and books - check.

So on to the details.  

kids fun science experiements lava lamps
Bubbling Beauty - Lava Lamp

Lava Lamps


Materials

  • Clear glass or plastic bottle
  • Vegetable Oil (liquid)
  • Water (liquid)
  • Food Colouring (liquid)
  • Alka Seltzer tablets(solid)


What we did

  • First we poured the vegetable oil into a tall glass jar.
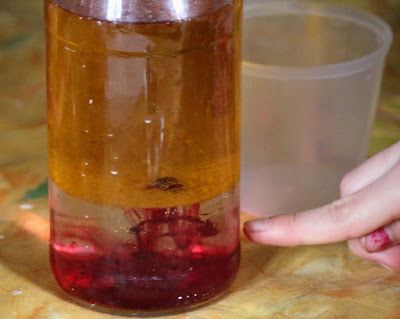
  • Then we used a dropper to drip water into the oil This meant the kids could see how the water didn't mix with the oil but sank through it to pool at the bottom. I prompted their observations by asking them to watch what happened and describe it to me. We then talked about how this was because the water was denser than the oil. If you look closely at the picture below you can see the water droplets beginning to cluster at the bottom of the jar.


Kids fun science experiments lava lamps
Dripping water into the oil

  • We did the same with the food colouring and again observed how it passed through the oil and then mixed with the water.

Kids science fun experiments lava lamps
Passing through the oil

kids science fun experiments lava lamps
Mixing with the water

  •  We took half an alka-seltzer tablet and dropped it into the jar and watched what happened.


Kids Science Fun Experiments Lava Lamps

Kids Science Fun Experiments Lava Lamps
Watching the Reaction


  • We asked ourselves what else we could experiment with? What would happen if we put the lid on or dropped in a whole alka seltzer tablet? We also added some blue food colouring to the red to see what that would do. And then we got out our biggest torch and put it underneath the bottle.


Kids Fun Science Experiments Lava Lamps
Watching to see what happens!

Kids Science Fun Experiments Lava Lamps
Lovely Shades of Purple


  • And just for good measure, we made some more! Three children often means three experiments. We began this together but luckily I had just enough oil and alka seltzer for them to do it again in smaller jars. This time they each worked by themselves and tried out some things differently to see what happened. Shaking happened, tipping upside down happened, adding differing quantities than the first time happened. And a lot of smiling and delight in the magic bubbles each and every time.

Lotta (5)


Noah (8)


Maya (11)


Best for...


Our sense of wonder. If you had to ask me what was the single thing that made this the ultimate kids science experiment for me so far, it would have to be the sheer delight on my kid's faces every time those bubbles appeared. With such simple and easily obtainable ingredients we did something really special.  There is something amazing about Lava Lamps. They reveal the beauty and wonder of chemical reactions between liquids, solids and gases in a very peaceful and stunning way. 


Kids Science Fun Experiments Lava Lamps
Watching the Lava Bubble
 
In conclusion, we had great fun with this experiment. It allowed us to continue exploring states of matter (check out our other experiments here) as well as the concept of density. As usual we wrote the experiment up on paper (more about how that works for kids of different ages next week) and talked about the science. We also learned about how real lava lamps are made by watching this documentary as well as reading about chemical reactions in our science books. 


Thursday, 1 March 2018

The Best Experiments to Explore States of Matter

Science was not my favourite subject as a kid. However, as I outlined last week, science really can be a lot of fun. Experiments are one of our best ways to liven things up and keep everybody interested. As home educators we learn together. Our ages range from 5 to well a lot older than that but donning the goggles and getting our hands dirty certainly seems to keep us all engaged. 

Today I'm sharing with you three of the best experiments I've found to explore states of matter.


Maya and Noah in observation mode


States of Matter Experiment 1 : Melting Chocolate


Melting chocolate is a really simple way for kids to talk about states of matter in particular solids and liquids. It's a concrete and practical exploration of what the properties of these two different states are. To make this more fun we combined this science experiment with a cookery experiment and tried our hand at making our own chocolate 'mendiants' - yum yum!


Materials  

  • Bars of chocolate (milk and dark)
  • Mixed nuts and dried fruits cut into very small pieces (we used raisins, cranberries, candied ginger, hazlenuts, walnuts and cashews, dried apricots and figs).
  • A bain-marie (we use a pyrex dish over a pan)
  • Baking try lined with greaseproof paper
  • spoons
  • aprons


What we did

  • First we looked at the bars of chocolate and discussed what state they were in and what were that state's characteristics (hard, brittle, holding its shape, etc).
  • Next we broke the chocolate into small pieces and melted it in the bain-marie. We took it in turns to observe it and talked about the change that was taking place. 
  • Once it was fully liquid we talked about the properties of liquids (flow, take the shape of their container, etc).
  • We discussed how we could transform the chocolate back into a solid. Heating it in the oven was suggested but we all agreed heating it was how it had melted so perhaps cooling it was best. 
  • We poured small spoonfuls of the liquid chocolate onto the lined baking tray and then sprinkled on different combinations of the dried fruit and nuts. 
  • We left the chocolats mendiants to set, checking on them regularly to see how they were doing.


Best for...

Kids who love chocolate, mums who love chocolate, Easter science activities, holiday season science experiments with gift-making. We really enjoyed this and the conversations we had were a great springboard for the rest of our work on states of matter.

Lotta ready to bake the scones!


States of Matter Experiment Two : Making Butter


It's an oldie but a goodie guaranteed to please everyone, young and old. This simple science experiment is not only fun to do but also provides a tasty treat at the end. You might want to make some delicious scones like we did to have something to spread your butter on.


Materials

  • a clean jar
  • a 240ml pot of double cream (a.k.a whipping cream)


What We Did 

  • First we poured the cream into the clean jar
  • We discussed the 'state' of the cream (the kids successfully identified it as a liquid)
  • We talked about how we could change it into a solid (heating it and cooling it were discussed). I explained to the children that we were going to try shaking it.
  • We began shaking the jar, stopping regularly (5minute intervals) to observe what was happening. We recorded our observations. After about ten minutes we had yummy whipped cream (yes we tasted!). After about 20 to 25 minutes the butter was beginning to separate out.
  • It took a bit longer, but we continued until we had a solid pat of butter, fully separated from the butter milk.
  • We poured off the butter milk and stored it in another jar (we used it in pancakes later). We really enjoyed eating 'our' butter.  


Best For ... 

Younger kids. They really enjoy science that's also cooking but this doesn't have to mean excluding your older children. Mine were delighted to rediscover this experiment and extremely proud of the yummy butter they made.


Exploring states of matter experimenting with Oobleck
Maya delights in the Oobleck


States of Matter Experiment Three : Oobleck  


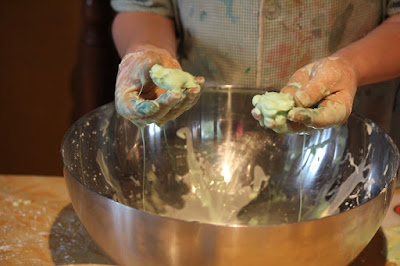
Oobleck or Cornstarch goo is a lot of fun and a great way to explore states of matter. It's a non-newtonian liquid which means depending on how you handle it, it reacts either like a liquid or like a solid. Kids love it because it's messy and gooey. And mums or teachers if you're thinking that sounds horrible, don't worry it's suprisingly easy to clean up. It can't go down your drain but it can be fed to your plants and if you wait it eventually goes powdery again and easily brushes off things and into the bin.


Materials 

  • Corn Starch
  • Water
  • Food colouring
  • Mixing Bowls
  • Aprons 
  • Protective covering for your work surface 


Oobleck acting like a liquid kids experiment
Flowing like a Liquid


What we did


(for more detailed instructions check out sciencebob's tutorial which is the main one we used) 


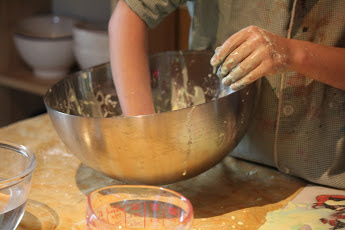
  • First of all we poured about a cup of cornstarch into our bowls and played with it to get a feel for the texture.
  • We poured half a cup of water into a measuring jug and added the food colouring of each child's choice to the water. 
  • We added enough water to the cornstarch mixing it in with our hands until it slowly flowed on its own. In our case this was pretty much all of it.
  • We played with the cornstarch goo. And boy was it fun. I threw some ideas out at the kids in the form of what does it do if ... and they threw in some of their own. A happy hour or more was spend just testing out what this stuff can do. 
  • We cleaned up after a bit of googling to find out how best to do it. We then watched some very funny YouTube videos of people walking on, running across and playing around with Oobleck. 
  • We read up on the science of non-newtonian liquids.


Oobleck acting like a solid kids experiment
Solid balls of Oobleck


Best for ...

Everyone though particularly kids who love getting their hands dirty. When the kids had finished, I have to admit I had a go too. There's something magical about Cornstarch Goo, how it's at once a liquid and a solid. And it just feels so good! And we were all really impressed when Noah managed to hold his bowl in the air by holding on to the Oobleck inside, now if that's not magic... 


Oobleck kids experiment, strong enough to lift a bowl
Noah's bowl hovering over the table!


All three of these experiments were fantastic, I really hope you'll try them with your kids. To support what we were learning through these hands on activities, we read up on the states of matter here and here. We also watched this great French kids documentary and this one in English. We then produced a visual schema showing what we'd learned about the three states and how matter changes from one state to another. After each experiment we do a little lab report which varies in style and detail according to the kids different ages and interest in written records. I'll share more about that soon and another fabulous states of matter experiment - the Lava Lamp!