

Learning in our house is often very hands on. Like in my best memories of primary school and the TV series Why don't You (you can also watch on youtube), we do a lot of cutting, sticking and general mess making.
Children have a natural desire to make things, they love cutting out and up, sticking, colouring, decorating, painting, making the things they're interested in. I've written about this before and in fact one of our latest crafting activities follows on directly from that post about knights and castles. But what has crafting got to do with our home education experience?
Firstly, I'd like to point out that it often responds to a demand either clearly stated or perceived by me. That sounds vague, what I mean is either, as in the case of the daggers shown here (instructions below), one of the children find a project that interests them and asks if we can do it. In the other case, I sense how interested they are in something and suggest a craft that will explore that. For example, I noticed Noah was reading a lot about castles and their construction and asked him if he'd like to have a go at making one himself. This balance between things the children bring to the table and things I, or my husband, offer is a really important one in our home education and permeates everything we do, be it crafting, reading, watching or participating in activities outside the home.
In both cases doing the craft project fuels their interest in something and a child's interest is a great gateway to learning about all sorts of stuff. For example, plugging in to Noah's interest in castles and knights has led to :
- making a working drawbridge which involved many discussions about weights and pulleys
- watching a series of BBC documentaries about the Castle of Guedelon (Secrets of the Castle) where we've learnt all sorts of things about life in the middle ages - their building techniques and materials as well as how they lived, fed and clothed themselves
- discussing materials and their relative strengths when making things such as daggers, swords and shields
- discussing finances and the cost of things when wishing to buy stuff to do with knights and castles
- reading the Arthurian legends together
So crating helps fuels other learning but it also has great value purely for itself. There are all the fine motor skills involved from using scissors to smoothing bubbles out of kitchen foil! Then there's the necessity of following instructions be they written or in the form of a video (often youtube) or given orally by me. That requires concentration and patience when we don't understand the instructions or each other. It also encourages them to keep things and upcycle them, to pay attention to detail in order to reproduce it and to be patient when things take a lot longer than originally planned.
Aside from all this and the great fun we have together during our crafting times, there is another important advantage. Making things often leads to imaginative play. In this case putting on a costume and a scary face while brandished new daggers. I believe that through imaginative play children make sense of the world and the things they are learning, in this case they play with our history, our past, try on what it might have been like to be a knight or a peasant a thousand years ago or so. As they grow older I hope they'll continue to explore like this through other creative outlets such as art and writing.


So to making the daggers!
The original idea came from one of the books in this Usborne pack. However due to materials available and the urgency of this project (isn't it always right now with kids) I adapted freely. Here I'll briefly outline the steps we followed to give you an idea:
- Draw a blade shape on a strong piece of cardboard with a longish oval shaped end like the top of a sword above it's hilt(we traced around the tip of a larger sword to get the shape right at the bottom). Cut it out.
- Draw the shape of a sword hilt on a piece of cardboard and cut it out. Then trace around it and cut out a second hilt. (I free handed this based on pictures from the Usborne book).

- Score down the middle of your blade and then stick a thin piece of cardboard down this middle line (end it with a point like the blade) to produce a little ridge. Do this on both sides.
- Now for the silver foil. This needs to be wrapped around all the pieces as tightly as possible. I applied glue to the cardboard and then we pressed it round gently being careful not to tear and trying not to get too many bumps and bubbles.This step is quite awkward and I had to help a lot.
- Stick the hilts to the blade on either side.
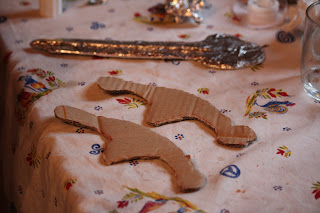
- Finally take some string or in our case wool and wind it around the top of the dagger above the hilt, not quite all the way to the top but covering a fair portion of this part of the dagger. I used double sided sticky tape to secure this at the beginning and then again at the end.


No comments:
Post a Comment